Sunday, June 8, 2014

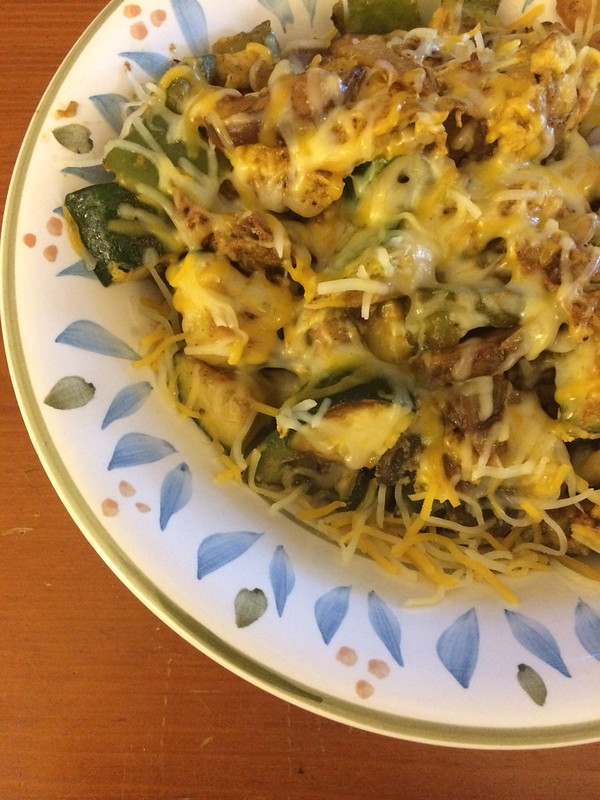
Sunday Morning Hash

This is a favorite for us at any time. It's easy, only uses one pan and it's very versatile. The bacon seasons the dish and adds the cooking fat, so there's very little you have to do to make this taste good!

You can also use fresh ingredients or reuse food from last night's dinner! I use bacon in this version, but it can be replaced with any protein. Just make sure you add butter or oil if you use something leaner than bacon. I've also used chopped Zucchini instead of the potatoes for a less heavy dish (make sure the onions are fully cooked as the Zucchini will only need to cook for a quarter of the time that the potatoes would need.)

As you will note in the recipe, I don't make a mise en place for this; I chop and go! I'm hardly a pro with my knifework, but I can do it fairly efficiently. If you're not fast or comfortable with the chop and go thing, cut up everything beforehand and add

Sunday Hash

3-4 Strips of bacon
1 large onion, chopped
2-3 cloves of garlic
4 large eggs
1/4 cup milk
1-2 oz cheese (we like cheddar)
2 medium potatoes chopped into 1/2-inch cubes.
1/4 tablespoon salted butter (optional, but delish)
Seasonings as desired. (I use salt, black pepper, Herbs de Provence and paprika)


  1. Begin preheating a large, non-stick skillet on medium. Cut up the bacon and add to heated pan. As the bacon is rendering and beginning to brown, chop up the onion and add to the bacon (about 1-3 minutes of cook time). The bacon will not be cooked all the way, but that's fine. It will be by the end!
  2. As the onions and bacon are cooking, cut up your potatoes and add them to the pan. The bacon will be getting some color and the onions will be starting to turn translucent. Don't worry if the onions don't look done as they will keep cooking along with the potatoes.
  3. Once the potatoes are in the pan, add the seasonings you want and combine everything in the pan. Mince the garlic and add to pan, stirring to combine. Cover, lower heat to medium low and cook for 5 minutes.
  4. Uncover, stir and cook for another 5-6 min. Repeat until potatoes are cooked through. If the outsides are getting too brown, lower heat more.
  5. While the potatoes are cooking, beat eggs and milk together and put aside.
  6. When the potatoes are cooked though, push contents of pan to one side. Add butter if desired (the existing fat in the pan should be enough in addition to the fact that you're using a non-stick pan. This is merely for flavor) to the empty side and add the eggs. 
  7. Begin scrambling the eggs. When the eggs are almost set, combine with the potatoes, bacon and onions.
  8. Sprinkle cheese on top. Serve with sour cream, salsa, hot sauce... whatever you want!
  9. Eat. 
  10. Coma.
Edit:

This is a variation with chicken and Zucchini:

 

Sunday, April 7, 2013

Low Carb Blueberry Cheesecake

I'm not a low carber, but I have friends that are and I don't like to leave people out when I cook. While not induction friendly, the use of Splenda definitely cuts some calories and brings the net carbs to under 25 grams per serving. Not bad for a slice of cheesecake!

I'm sure there are many, many technical flaws in this, but I don't care. It's yummy and easy.

If you only use half of the blueberry swirl, it cuts the net carbs down to 14 grams per serving. You could cut it even more by using regular splenda instead of the brown sugar blend in the crust, but I think it tastes better with the brown. This IS a treat, after all!

If you want to cut more calories, you can use low fat ricotta and cream cheese, but your carbs will go up. So, pick your poison. I personally prefer the taste and texture of full fat (and real sugar, but today is not the day).

You'll need a food processor for the crust and filling and a 9-inch square pan lined in foil. I blended the blueberries with an immersion blender.

You can also add some lemon juice to the blueberries if you want to brighten up the flavor a little. To the filling, too! Just do it to taste!

Makes 9 servings.


Crust
5 tablespoons butter, melted
1 cup sliced almonds
2 tablespoons flax seed
1 tablespoon splenda brown sugar
1/4 teaspoon cinnamon
Pinch fresh nutmeg
Pinch salt

Blueberry swirl
2 cup frozen blueberries
1/2 cup water
2-4 tablespoons splenda, depending on taste and sweetness of the fruit
1 teaspoon vanilla
Pinch salt
Pinch fresh nutmeg 

Filling
2, 8oz blocks of cream cheese
1 15oz tub of ricotta
3 whole eggs
1/3 cup Splenda
1 teaspoon salt
1 tablespoon vanilla
1/2 teaspoon almond extract
fresh nutmeg to taste

Method
  1. Line a 9-inch square baking dish with foil. Preheat oven to 400F.
  2. Combine all the ingredients for the crust into a food processor and pulse until it's finely chopped and blended, but not a paste.
  3. Spread crust onto the bottom of the pan, being careful to not have any holes.
  4. Bake crust for 8-10 minutes and allow to cool. Turn oven to 350.
  5. Combine all ingredients for the swirl in a small saucepan and cook until the berries are tender. Blend if desired. Allow to cool to room temp.
  6. Combine all ingredients for the filling in a mixer or food processor until smooth. Pour over cooled crust and spread.
  7. Pour cooled blueberry swirl over filling. With a butter knife or spatula, gently swirl the filling and blueberry swirl together. 
  8. Bake for 10 minutes in a water bath*, then turn temp down to 350F and bake for another 45-75 min or until set (the middle of the cheesecake will have a slight jell-o jiggle to it).
  9. Cool to room temp and chill for at least an hour.
Here are the screenshots from my recipe entries on MyFitnessPal.com. The top one is with half the blueberries.


* If you've never done a water bath, it's very easy. You're going to place the pan with the cheesecake inside a larger pan and fill the larger pan with an inch of water, being careful to not get any water in the cheesecake. The water bath is an important step with baked goods like cheesecake because it keeps the top from drying out and cracking. When you're done baking, just take the smaller pan out of the water and let the pan with the water cool in the oven. 

Sunday, December 30, 2012

Basic White Bread

This is a variation of a James Beard recipe. It's good, basic bread to learn on as it's fairly forgiving. It's soft, it's got a nice mild flavor and it rises quickly. Loaves don't last long here. ;)

Makes two loaves.

Bread!

1 package instant yeast
3 teaspoons white, granulated sugar
2 cups water
5-6 cups AP flour
2 teaspoon salt
3 tablespoons butter

  1. In either a bowl or a mixer, combine water, sugar and yeast. If you are substituting active dry with the instant, allow to bloom. Otherwise, go to step two.
  2. Add 4 cups flour and combine.
  3. Add salt, butter and rest of flour.
  4. Allow to sit for 20 minutes at room temp in bowl
  5. Pour dough onto well-floured board and knead until the dough passes the windowpane test* or when the dough springs back when you push your finger in.
  6. Put dough into greased bowl and brush oil on the top. Cover with plastic wrap and stick in a warm place until double in size. (I like turning on the oven for a minute, turning it off and putting the bread inside.)
  7. Punch down and knead for two minutes or until all the air bubbles are gone.
  8. Divide in half. Shape each half into a rectangle as wide as your loaf pans are long and roll up.
  9. Put dough in two greased loaf pans, oil the top, cover with plastic wrap and let rise until double.
  10. Preheat oven to 375F. 
  11. Brush loaves with water, slash top if desired and bake loaves until done, about 20-30 minutes.
  12. Let cool for 5-10 min before removing from pans. Let cool before cutting loaves.
*Window pane test: tear off a small bit of dough and stretch it so light passes through it without tearing. Pics here.


Wednesday, December 26, 2012

Cinnamon Rolls

The dough can also be used as a dinner roll if you don't Cinnamon Roll it! It's a mildly altered version of this recipe.

About the room temp liquids: I think warm water at 110 hurts the yeast. Room temp water is going to be between 70-80 degrees, which is more than ample to wake up those little yeasty buggers. If you're doing this in a colder environment and your water is cold, use a slightly warm water. Or just be patient- the bread will still rise, just slower. It will even deepen the flavor if that happens, so don't worry.

Makes two pans of rolls when baked in 8-inch cake pans.

I will save the 2nd tray to make a bread pudding that's so good it might be banned in New York City.

There is an obscene amount of butter here and I'm not one bit sorry.

Tuesday, December 25, 2012

What Xmas Hath Brought


Cookbooks and something to cook in. :D

Now, I got the Dutch Oven last month from Terry, but as a Christmas gift. So, it's included!


Sunday, December 23, 2012

Cinnamon Roll Bread Pudding

This was a fluke recipe that came about from not wanting to toss a bunch of stale cinnamon rolls. It was one of the best food saving moves ever!

You could also use store bought premade rolls or a can of rolls that you bake, but doing it yourself is worth the effort if you have the time. It really does taste better! Either way, allow them to stale up before making this as it will improve the texture of the end product.

You want this to be pretty wet going into the oven. If the bread soaks up too much liquid, add more liquid.

Pudding:
6 cups cubed stale cinnamon rolls (one half of a batch of rolls)
2 cups milk
5 eggs
2 cups milk
2 tablespoons vanilla
1/2 teaspoon almond extract
1 teaspoon cinnamon
pinch fresh nutmeg
1/4 teaspoon allspice

Crumble:
1 stick butter, softened
1/4 cup brown sugar
1/4 cup rolled oats
pinch salt
pinch fresh nutmeg
pinch allspice

Sauce:
2 cups sugar
1 egg, beaten
half stick butter
pinch salt
1 teaspoon vanilla
1/4 cup brandy
  1. combine sugar, spices and eggs in a bowl and mix until combined. Add the cubed rolls and toss to combine. Pour into baking dish.
  2. With a fork or pastry cutter, combine all the ingredients for the crumble. Drop over top of unbaked pudding
  3. Cook in preheated 375 degree oven for 40 minutes or until brown on top and bubbling.
For Sauce:
  1. Melt butter in pan on low heat. Add sugar and egg. Stir to combine. Cook until sugar is melted. Add vanilla and brandy and cook for 1-2 more minutes or until alcohol is cooked off to your liking.

Friday, December 21, 2012

Unemployment and Baking: How Sourdough Saved My Life

As many have these last few years, I've found myself without a regular source of income. I'm lucky in that there is income coming into our house via my other half and I do have other means of working until something steady comes along (or I get more clients...). Which is grand until you take into account that I cannot left to my own devices for very long. I need things to do. If I get bored, things happen. Sometimes it will be watching an entire series' worth of TV shows on Netflix. Sometimes it will be a hobby. Sometimes it will be learning something new. Sometimes, things that I do are not too successful. Sometimes the level of unsuccessfulness are rather epic.

This is why we cannot have nice things.

Tuesday, August 21, 2012

Barley and Seitan Stirfry

Hearty and filling, you can make it a low-sodium affair by omitting the soy sauce in favor of sodium-free veggie broth.

1 Cup Cooked Barley
1 Cup Stirfry Veggie mix (I really like Marjon Stirfry Vegetables)
1/2 Cup Mushrooms
2 servings Seitan
1 Tablespoon Olive Oil
1 Tablespoon Regular Mayo
1/2 teaspoon Sesame Oil
1/2 teaspoon fresh ginger
1 Tablespoon fresh lemon juice
2 Tablespoons Low Sodium Soy Sauce

  1. On medium high heat,  heat the olive oil. When at temp, sautee the seitan until lightly browned. 
  2. Add the mushrooms, barley and veggies, stir to combine and let sit for a minute.
  3. Add the soy sauce and lemon juice and stir
  4. Cook for another 5 minutes or until vegetables are cooked to your liking.
  5. Remove from heat
  6. Combine Mayo, ginger and Sesame oil into a sauce and add to the pan. Stir to coat
  7. Serve!

Monday, August 6, 2012

Maple Cinnamon Overnight Oats

I hate breakfast. Well, not really; I hate the effort to make breakfast on workday mornings. It's bad enough I have to get dressed and shower- I'm supposed to COOK too??

I used to get sick if I ate too soon, but I actually have a morning appetite since cutting out most meat in favor of meat-free protiens and adding back in more complex carbs. So, what's a hungry, unmotivated-to-cook girl to do?

Overnight oats. Instead of boiling the oats and eating them hot, you let them soak in liquid and your seasonings overnight. They're light, tender and you exert no more effort in the morning other than cutting a bit of fruit if you want. I've experimented for a few days on this, and here's my favorite version. I use real Maple Syrup (I like Grade B- it's richer in taste and cheaper. Score.) good Cinnamon and fresh Nutmeg here. Good ingredients make a difference!

You'll need:

1/2 cup rolled oats
1/2 cup milk (3/4 cup if using Greek Yogurt)
1/2 plain, unsweetend yogurt
1 Tablespoon maple syrup
1 teaspoon cinnamon
1/8 teaspoon fresh nutmeg
1/4 teaspoon vanilla extract
Dash salt

  1. In a regular soup or cereal bowl, combine all the ingredients.
  2. Cover and chill overnight. 
  3. Serve with fruit or whatever you'd like!
Stupidly easy. It takes me all of 3 minutes to get this whipped up after dinner. It's fast and very customizable. Basically, the 1/2 cup each formula of milk, yogurt and oats works the best for me. You can season and sweeten however you'd like! Just please use the dash of salt. Bland oats will destroy us all.

Monday, July 30, 2012

Barley and Tomato Salad

7 cups of cooked Pearled Barley (I cooked up one bag of Publix Pearled Barley per the directions on the side of the bag).
2 cups chopped tomatoes (you can use canned if you'd like- just get the low sodium kind)
Juice of 2 limes
Tablespoon of Red Wine Vinegar
2 Tablespoons of Extra Virgin Olive Oil
a handful of fresh Cilantro (basically, a 1/4 cup, chopped)
1-2 cloves of chopped garlic according to taste
salt and pepper to taste

All you do is combine the ingredients, stir and then chill. The nice thing about grain salads like this is they're good warm and hot, are easy to throw together and are really good for you!

If you don't like raw garlic, lightly saute it in the olive oil before adding.

Sunday, December 11, 2011

Homemade Fresh Cheese

This isn't a recipe that I developed, it's a variant on a theme that I've seen for cheeses of this type. It's basically Cottage Cheese/ Ricotta, but it's amazing and will ruin you for store-bought for life.

It's very simple- I did this in about an hour, most of that time waiting for the milk to heat. I used white vinegar instead of rennet because I think it's easier to find, lasts longer and is cheaper. It also takes out the element of animal vs vegetable rennet, which could infringe on some meatless diets. White vinegar is also a neutral-tasting vinegar, so it doesn't take away from the milk. But, it's so simple to make and modify- you can use a different vinegar, add herbs and spices, whatever you want. I've seem citrus being used as well, but I like the availability, predictability and stability of the vinegar used in the basic recipe. Although, lemon is quite refreshing. It's worth playing with to be sure! It's made me want to try more cheeses!

Makes about 16oz and is good for a week.

Tools:
  • Stainless Steel Pot with a nice, thick bottom.
  • Cheesecloth (or some other kind of thin fabric to strain with)
  • A colander (you line this with the cheesecloth)
  • A thermometer, if desired 

Ingredients
  • Half-Gallon Whole Milk
  • 4 oz white vinegar
  • salt to taste


Method:
  1. Line the colander with the cheesecloth.  
  2. Slowly bring all of the milk to just below a boil. Make sure the milk does not scorch.
  3. Once the milk reaches an almost boil (steaming and frothy. About 190°F if you're using a thermometer) , remove from heat and add the salt and vinegar and stir well. You'll notice that the milk will instantly separate into chunky bits and yellow liquid. This is supposed to happen; the yellow is the whey that will be drained off. If it doesn't separate, then there's not enough vinegar- just add a little more. (Yes, yes- it's scary and weird-looking. Cheese is weird and we're not even dealing with molds.)
  4. Let the mixture sit for 10 minutes.
  5. Carefully (it will splash a tad) pour the mixture into the cheesecloth-lined colander and let it drain for 15 minutes.
  6. If you choose to add more flavorings (I like fresh black pepper and Italian Seasoning), do so now. The mixture will be very liquid still.
  7. Pull the edges of the cheesecloth up and twist to the cheese is in a ball and slowly squeeze out more liquid. 
  8. Turn out your newly-formed cheeseball into a bowl, cover and chill


Monday, September 5, 2011

Hail Seitan!

Yes. You read that right: Seitan. Wheat Meat. Fake meat. Mock Duck.

Yes, I eat it. It's good. Yes, I also eat Carnitas.

See, I'm not a vegetarian, but I do have meatless days. I used to cook this a LOT a while back, but got out of the habit. No reason for it, really- you can get a good large batch ready in an hour and let it sit ready in the fridge- once it's cooked, it's nothing but a quick sauté and it's done! And you can sub it for quite a bit. You can also make it taste however you want, so you can make it your own very easily.

This version I made to be beefy and rich; it's the kind of vegetarian food that reminds me that it's not all carrots and lentils. This is stick-to-your-ribs stuff, here!

You can get the vital wheat gluten and nutritional yeast at any health food store. When I lived in the city, you could get both at larger supermarkets.

You'll also notice that I use salt-free broth. I prefer low-sodium/ sodium free ingredients because I can then add the salt how I want. Keep in mind that the broth will also infuse more flavor and salt into the Seitan, so you might find you need less salt than you think. Experiment here.

Recipe updated 8/5/2012 


"Beefy" Seitan

For the Seitan:
  • 3.75 cups Wheat Gluten
  • 3/8 cup nutritional yeast
  • 2 teaspoons each onion and garlic power
  • heavy pinch freshly ground black pepper
  • 5 Tablespoons Extra Virgin Olive Oil
  • 2 oz lemon juice
  • 5 tablespoons reduced sodium Soy Sauce

For the broth:
  • 4 cups veggie broth
  • one cup of soy sauce
  • 3 bay leaves
  • 2 cloves of garlic
  • dash on onion powder
Method:
  1. Combine ingredients for the broth and start to heat
  2. Combine all dry ingredients for the Seitan in a bowl.
  3. In a separate bowl or measuring cup, combine all wet ingredients for the Seitan (you should have a full cup of liquid.)
  4. Add wet to dry and combine until just mixed. 
  5. Knead dough until everything is combined; dough should be mildly dry (if it's too wet, you'll get soggy Seitan. And no one wants soggy Seitan).
  6. Separate dough into two logs.
  7. Add both logs to simmering broth and cook covered at just a simmer for 45 minutes to an hour, turning occasionally.
And there you go. Take it out, drain, slice, sauté and serve. Or take it out, drain, slice and refrigerate. Whichever.

If you find you want a less-dense product, try adding a little oil to the dough or adding a tad more liquid.

Sunday, July 31, 2011

Monday, March 21, 2011

Roasted Broccoli

I have yet to find a veggie that doesn't do well in the oven. Things like this are nice because they don't require much skill, attention, preparation or time, but it's hard to mess up and it's always good. And hey- one less thing hogging the stovetop.

I love roasted broccoli because there are so many things that happen to it while roasting- it gets sweeter and richer without being bitter and there's a little bit of texture with the charred bits and the caramelized bottom. It's everything steamed and boiled broccoli want to be but can't.


Roasted Broccoli

Ingredients:
  • One broccoli top, cut into medium-sized pieces.
  • Enough Extra Virgin Olive Oil to lightly coat broccoli
  • Salt (Kosher or Gray is best here), Fresh-Ground Pepper and garlic powder* to taste
  • Juice of half a lemon (or to taste)
  • Crumbled goat cheese to top (optional)
Method:
  1. Preheat oven to 400F
  2. Drizzle oil on broccoli and mix to cover evenly
  3. Sprinkle on salt, pepper and garlic as desired
  4. Roast for 10 minutes or until the tops are just starting to char and the broccoli has just darkened from the super-bright green stage.
  5. Drizzle with lemon and cheese
  6. Serve and enjoy
Obviously, you can use whatever cheese you want. I like the bright fresh creaminess of the goat cheese, but whatever floats your boat.

*Okay. So, fresh garlic vs powdered. Fresh garlic tastes amazing, but it a situation like this, it will burn and not taste good at all. The dry stands up to the heat better and won't burn. Besides, the dried gives a more subtle flavor without overpowering the food in this circumstance.You'll thank me later.

Wednesday, February 16, 2011

Simple Sauteed Kale

As requested by Jess and Cristina, this is how I do Kale (and mustard greens). Well, roughly. I do a LOT of things like this by eye, so this is just a general idea.

The trick to leafy greens is not overcooking. They need to be softened, but not cooked to oblivion. Kale is nice because you can do this in 10 minutes from start to finish. It should be just past the uber bright green phase; it will be soft while still having a little bite to it.

I prefer using non-bagged kale for this because I can remove the stem. It's also cheap as all get out (I paid 99 cents for my last bunch and it will last for days)! But, if you like the texture of the stem, rock on! If you buy it fresh, look for stems that aren't bendy and leaves that feel fresh, strong and not slimy. Remove the leaves from the stem and tear the leaves into the size you want. Don't forget to clean the kale!

Also keep in mind that it's going to look like tons of kale- it will wilt down, so don't worry.

So, without further adieu...

Ingredients
  • 3-4 whole leaves (leaves on the stem) of kale, either coarsely chopped or de-stemed and cut down. If you use bagged, it's approx two handfuls.
  • One shallot (or 1/4 onion), chopped.
  • One clove garlic, chopped
  • Abt 1-2 tablespoons Dry Vermouth
  • Salt and Pepper to taste (I like kosher and fresh ground black, respectively
  • Pinch fresh-ground nutmeg (optional, but worth it- greens love nutmeg)
  • 1 Tablespoon olive oil


Method
  1. Heat oil in Saute pan or Wok over medium heat
  2. Add shallots (with a little salt and pepper) and saute lightly until clear
  3. Add garlic and saute 1 more minute
  4. Add kale, toss a few times and add the vermouth a little at a time until the kale just starts to wilt
  5. Toss the kale for approx 3-5 minutes or until it softens and just darkens from the very bright green.
  6. Add salt, pepper and nutmeg as desired.


The nice thing about this is you can add and subtract whatever you want. You can add mushrooms to the onions. You can use veggie stock instead of the Vermouth (you might want to add a little lemon at the end if you do, though.). I'll even stir in a dollop of sour cream or Greek Yogurt. It's really versatile. :)

Saturday, January 8, 2011

Roasted Root Veggies

After all the richness of the holiday foods, I needed something lighter! This is an old winter standby for me.

A lot of this is done by eye, which makes putting this into a recipe somewhat of a challenge. Basically what you're looking for is equal parts of the larger veggies cut in to similar-sized bits.

Another way you can handle the garlic, aside from the medium mince in the recipe below, would be to cut the cloves in half or leave them whole. Just add more cloves if you go this route. Remember, the finer the chop, the more garlic flavor that will come out.

Roasted Root Veggies

Ingredients:

  • 1-2 large carrots

  • 1-2 large parsnips

  • 1 large fennel bulb with the fennel leaves removed and reserved

  • 1-2 red onions

  • 1-4 red potatoes

  • 1-3 cloves of garlic

  • Herbs de Provance to taste

  • Kosher Salt and Fresh Ground Pepper to taste (but, don't be shy)

  • One teaspoon, finely chopped fennel leaves from the fennel bulb (optional)

  • Olive Oil and Vermouth


Method

  1. Preheat the oven to 400

  2. Peel and chop all veggies into 1/2 to 1-inch cubes (everything should be the same size, but remember that the larger the cubes, the longer the cook time, except the garlic, which you should do a medium mince. Chop the potatoes first so they can soak while you prepare the rest of the veggies. Leave the skins on if desired (just wash them first, mkay?). For the fennel, chop the top off and only use the bulb

  3. Drain the potatoes and combine all the veggies, including the garlic, in a bowl.

  4. Drizzle enough olive oil and vermouth to coat everything, using more oil than vermouth. Add all seasonings.

  5. Cover and allow to sit on the counter for 5-10 minutes.

  6. After a quick toss, pour out the veggies onto a foil-lined cookie sheet and bake for 20-50 minutes (depends on veggie size and your oven.). Root veggies can take a while, so be patient. Turn veggies occasionally.

Wednesday, January 5, 2011

Tuesday, January 4, 2011

Cheesy Potato Shallot Soup

Cream, cheese, potatoes and bacon; there is nothing wrong with this. Unless you're a lactose intolerant, bacon-hating low carber, of course. Or vegan. Then, there's just more for the rest of us. So, party on you lactose intolerant, bacon-hating low carbers and vegans!

Prep time is a little long if you're peeling and chopping your own taters, but it's worth it. But, you can always get a bag of Simply Potatoes if you want to speed the process. Cook time is about a half-hour.

The only trick to this soup is stirring in the cheese. In a normal cheese sauce/ broth situation, you'd use a whisk to incorporate the cheese. Here, the potatoes would get in the way. I used a slotted spoon and the folding method and the cheese blended beautifully.

Cheese Potato Shallot Soup

Ingredients:
  • 3 strips thick-sliced bacon, cut into cubes
  • 2 shallots, diced
  • 4 russet potatoes, chopped into 1/4 inch cubes and soaked
  • 3 cups heavy cream
  • 2 cups grated cheddar cheese
  • 1-2 cups chicken stock
  • 1-2 teaspoons Worcestershire Sauce
  • sprinkle Italian seasoning
  • pinch dry mustard
  • 1-2 cloves of garlic, finely chopped
  • Kosher Salt and Ground Black Pepper to taste


Method:
  1. Cook bacon in saucepan until crispy. Remove from pan and reserve for topping. Leave rendered fat in pan.
  2. Lightly saute shallots in bacon drippings and a little salt and pepper for 2-3 minutes until slightly clear. Add garlic and cook for one more minute.
  3. Drain potatoes and add to Shallot/ Garlic mix in pan. Add several large pinches of salt, 1-2 more grinds of pepper, the dry mustard, the Italian seasoning and the stock. Stir, cover and simmer for 15 minutes.
  4. Add the cream, Worcestershire, and bring to scalded temp (steaming without bubbles). Slowly add the cheese a pinch at a time. Gently fold to combine the cheese, not adding any more cheese until the previous addition is no longer visible.
  5. Add more salt and Worcestershire if needed.
  6. Top with bacons. Eat. Enter soup coma.

Saturday, January 1, 2011

Garlicky Herb Cheese Dip

The trick to any kind of dip is you HAVE to let it sit for a while and steep. Some flavors will mellow while others will come out stronger, but the main thing is the flavors will become more cohesive and blend so much better. Basically, the flavor profile will change dramatically for the better after a 24-hour chill out in the cold box. Same goes for other dips, as well.

This is an easy dip to prepare- no cooking, just a little chopping of the herbs and crushing of the garlic before dumping it all in the food processor.

This dip is also better with fresh herbs, but you can modify it for dry if you want. You might have to up the measurements, though.

And seriously- buy good cheese for this. That pre-grated processed stuff that's been sitting on the shelf for weeks? Please, don't. It won't taste good and it won't function the same way in the dip. If you get pre-grated, get the fresh-grated from the deli.

Garlicky Herb Cheese Dip

Ingredients
  • 1 8oz Package cream cheese
  • 1 tablespoon Mayo
  • 1 cup sour cream (add more if you want a thinner dip)
  • 4 oz each Freshly grated Parmesan and Asiago
  • 2-3 cloves garlic
  • 1/2 teaspoon rosemary
  • 1 teaspoon fresh sage
  • 1/4 teaspoon thyme
  • One small handful (Approx a cup) fresh flat-leaf (Italian) parsley
  • A couple drops of Tabasco
  • 1/4 teaspoon onion powder
  • pinch of dry mustard
  • fresh-ground pepper to taste (I usually add 1/8 teaspoon)
  • Salt to taste, if by some chance the cheese doesn't provide enough.


Method
  1. Chop herbs and run garlic through garlic press (or mince it), add to food processor and blend until finely chopped, but not a paste. Use the pulse setting for this.
  2. Add Cream cheese to garlic herb mixture and blend until combined.
  3. Add the sour cream, mayo and cheese and blend. Add more sour cream by the spoonful if desired for a thinner dip.
  4. Add the Tabasco, onion powder, dry mustard and pepper. Blend
  5. Put in serving bowl, cover and chill for at least 12 hours. 24 hours is better.


I find that the parsley is very strong at this stage and the garlic hits you at the end. I almost regretted the amount of parsley at first. Don't worry- this will change a lot after sitting. Resist the urge to add more garlic until you let it sit. The parsley/ herbs will mellow and the cheese and garlic will come out more.

Have I mentioned you should let this sit for a while? Because you should. ;)

Wednesday, December 29, 2010

Homemade Onion Dip

"This dip with either start wars or end them"
                                         -Cristina

We tried this out last weekend at the Xmas gathering at our place. Two different people tried to steal the dip and by the end of the night, the bowl was empty.  The next day, people were requesting more.

You have to let the onions slowly cook down.  There is no way to speed the process up.  If you do, you'll just end up with burned onions, rather than true Caramelized onions.

This is my variation of the original.

Caramelized Onions
  • 3 large (4 small) sweet onions, diced to 1/4"
  • 4 tablespoons butter
  • 1-2 teaspoons brown sugar (to taste if needed; it's only needed this addition once for me)
  • 1-2 Pinches salt (3/4 way through cooking, to taste)
  • 1-2 Pinches pepper (3/4 way through cooking, to taste)

Heat the butter in a large skillet over medium heat.  Add the onions, salt and pepper and stir to coat. Reduce the heat to low and cook until the onions are golden, stirring every 5 minutes.  This step will take 45-80 minutes, depending on the onions.  (note: it will look like a LOT of onions initially, but they will reduce in volume by about 70% when they are done cooking)

Add more salt and pepper if needed. If not sweet enough, add the brown sugar and cook for an additional 5 minutes.

To make the dip:
  • Caramelized onions (at room temperature)
  • 8 ounces room temperature cream cheese
  • 1 cup sour cream
  • 1 cup regular mayonnaise
  • Pinch of paprika
  • 1/2 tsp cracked black pepper
  • Pinch of salt
  • 1 large clove garlic

Assemble all ingredients in food processor and mix on low speed to combine.  Scrape down sides of bowl a couple times during mixing to ensure dip is fully mixed.
Place dip in sealed bowl and refrigerate for 24 hours.
Take out of refrigerator 15-20 minutes before serving to allow dip to come to room temperature.  Stir before serving.